Cloud-based development environments enable a better developer onboarding experience and help make teams more efficient. In this tutorial, you'll learn how to ready your infrastructure for on-demand, cloud-based development environments. You'll also learn how to set up the requirements, manage Kubernetes clusters in different clouds, create your first workspaces and custom images, and get tips for troubleshooting.
The GitLab agent for Kubernetes, an OAuth GitLab app, and a proxy pod deployment make the setup reproducible in different Kubernetes cluster environments and follow cloud-native best practices. Bringing your infrastructure allows platform teams to store the workspace data securely, control resource usage, harden security, and troubleshoot the deployments in known ways.
This blog post is a long read so feel free to navigate to the sections of interest. However, if you want to follow the tutorial step by step, the sections depend on one another for the parts pertaining to infrastructure setup.
- Development environments on your infrastructure
- Requirements
- GitLab OAuth application
- Kubernetes cluster setup
- Workspaces proxy installation into Kubernetes
- Agent for Kubernetes installation
- Workspaces creation
- Tips
- Share your feedback
Development environments on your infrastructure
Secure, on-demand, cloud-based development workspaces are available in beta for public projects for Premium and Ultimate customers. The first iteration allows you to bring your own infrastructure as a Kubernetes cluster. GitLab already deeply integrates with Kubernetes through the GitLab agent for Kubernetes, setting the foundation for configuration and cluster management.
Users can define and use a development environment template in a project. Workspaces in GitLab support the devfile specification as .devfile.yaml in the project repository root. The devfile attributes allow configuring of the workspace. For example, the image attribute specifies the container image to run and create the workspace in isolated container environments. The containers require a cluster orchestrator, such as Kubernetes, that manages resource usage and ensures data security and safety. Workspaces also need authorization: Project source code may contain sensitive intellectual property or otherwise confidential data in specific environments. The setup requires a GitLab OAuth application as the foundation here.
The following steps provide an in-depth setup guide for different cloud providers. If you prefer to set up your own environment, please follow the documentation for workspace prerequisites. In general, we will practice the following steps: 0. (Optional) Register a workspaces domain, and create TLS certificates.
- Create a Kubernetes cluster and configure access and requirements.
- Install an Ingress controller.
- Set up the workspaces proxy with the domain, TLS certificates, and OAuth app.
- Create a new GitLab group with a GitLab agent project. The agent can be used for all projects in that group.
- Install the GitLab agent for Kubernetes using the UI provided Helm chart command.
- Create an example project with a devfile configuration for workspaces.
Some commands do not use the terminal indicator ($ or #) to support easier copy-paste of command blocks into terminals.
Requirements
The steps in this blog post require the following CLI tools:
kubectlandhelmfor Kubernetescertbotfor Let's Encrypt- git, curl, dig, openssl, and sslscan for troubleshooting
Workspaces domain
Workspaces require a domain with DNS entries. Cloud providers, for example, Google Cloud, also provide domain services which integrate more easily. You can also register and manage domains with your preferred provider.
The required DNS entries will be:
- Wildcard DNS (
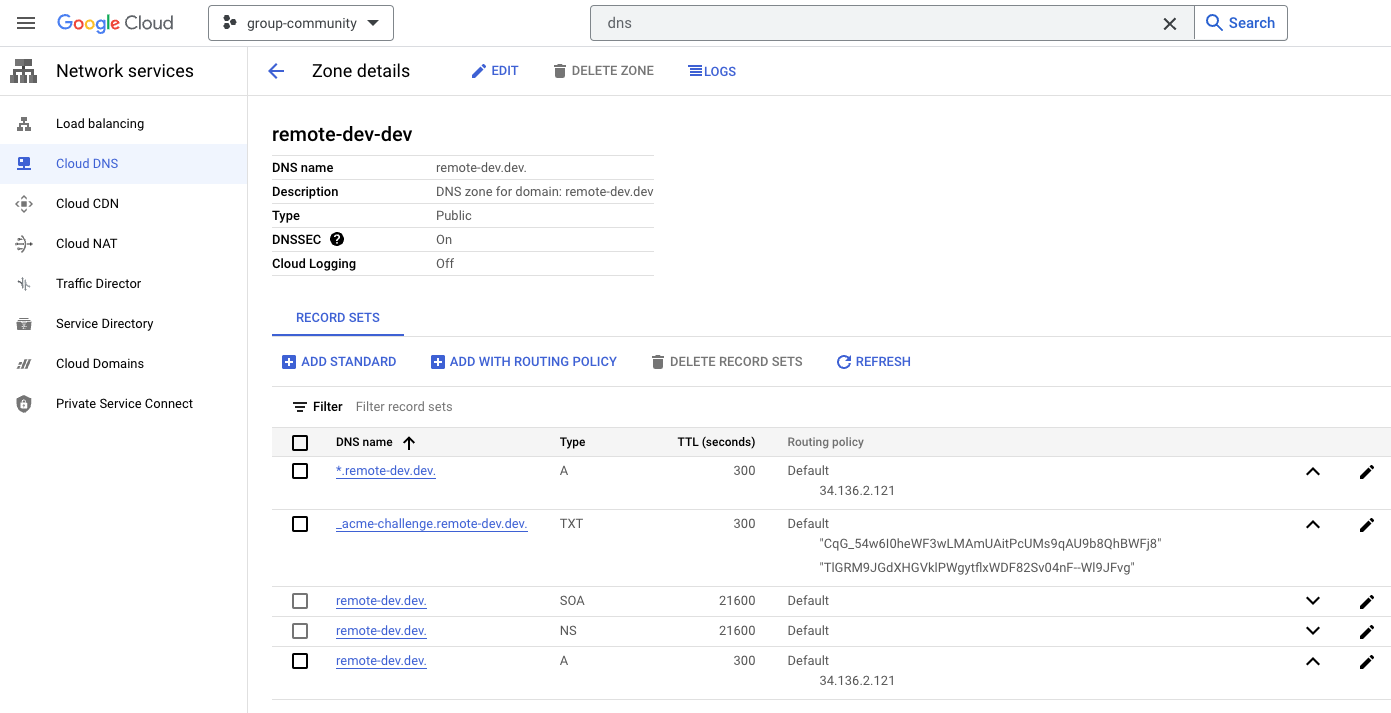
*.remote-dev.dev) and hostname (remote-dev.dev) A/AAAA records pointing to the external Kubernetes external IP:kubectl get services -A - (Optional, with Let's Encrypt) ACME DNS challenge entries as TXT records
After acquiring a domain, wait until the Kubernetes setup is ready and extract the A/AAAA records for the DNS settings. The following example shows how remote-dev.dev is configured in the Google Cloud DNS service.
Export shell variables that define the workspaces domains, and the email contact. These variables will be used in all setup steps below.
export EMAIL="[email protected]"
export GITLAB_WORKSPACES_PROXY_DOMAIN="remote-dev.dev"
export GITLAB_WORKSPACES_WILDCARD_DOMAIN="*.remote-dev.dev"
Note: This blog post will show the example domain remote-dev.dev for better understanding with a working example. The domain remote-dev.dev is maintained by the Developer Evangelism team at GitLab. There are no public demo environments available at the time of writing this blog post.
TLS certificates
TLS certificates can be managed with different methods. To get started quickly, it is recommended to follow the documentation steps with Let's Encrypt and later consider production requirements with TLS certificates.
certbot -d "${GITLAB_WORKSPACES_PROXY_DOMAIN}" \
  -m "${EMAIL}" \
  --config-dir ~/.certbot/config \
  --logs-dir ~/.certbot/logs \
  --work-dir ~/.certbot/work \
  --manual \
  --preferred-challenges dns certonly

  certbot -d "${GITLAB_WORKSPACES_WILDCARD_DOMAIN}" \
  -m "${EMAIL}" \
  --config-dir ~/.certbot/config \
  --logs-dir ~/.certbot/logs \
  --work-dir ~/.certbot/work \
  --manual \
  --preferred-challenges dns certonly
The Let's Encrypt CLI prompts you for the ACME DNS challenge. This requires setting TXT records for the challenge session immediately. Add the DNS records and specify a low TTL (time-to-live) of 300 seconds to update the records during the first steps.
_acme-challenge TXT <stringfromletsencryptacmechallenge>
You can verify the DNS records using the dig CLI command.
$ dig _acme-challenge.remote-dev.dev txt
...
;; ANSWER SECTION:
_acme-challenge.remote-dev.dev.	246 IN	TXT	"TlGRM9JGdXHGVklPWgytflxWDF82Sv04nF--Wl9JFvg"
_acme-challenge.remote-dev.dev.	246 IN	TXT	"CqG_54w6I0heWF3wLMAmUAitPcUMs9qAU9b8QhBWFj8"
Once the Let's Encrypt routine is complete, note the TLS certificate location.
Successfully received certificate.
Certificate is saved at: /Users/mfriedrich/.certbot/config/live/remote-dev.dev/fullchain.pem
Key is saved at:         /Users/mfriedrich/.certbot/config/live/remote-dev.dev/privkey.pem
This certificate expires on 2023-08-15.
These files will be updated when the certificate renews.

Successfully received certificate.
Certificate is saved at: /Users/mfriedrich/.certbot/config/live/remote-dev.dev-0001/fullchain.pem
Key is saved at:         /Users/mfriedrich/.certbot/config/live/remote-dev.dev-0001/privkey.pem
This certificate expires on 2023-08-15.
These files will be updated when the certificate renews.
Export the TLS certificate paths into environment variables for the following setup steps.
export WORKSPACES_DOMAIN_CERT="${HOME}/.certbot/config/live/${GITLAB_WORKSPACES_PROXY_DOMAIN}/fullchain.pem"
export WORKSPACES_DOMAIN_KEY="${HOME}/.certbot/config/live/${GITLAB_WORKSPACES_PROXY_DOMAIN}/privkey.pem"

export WILDCARD_DOMAIN_CERT="${HOME}/.certbot/config/live/${GITLAB_WORKSPACES_PROXY_DOMAIN}-0001/fullchain.pem"
export WILDCARD_DOMAIN_KEY="${HOME}/.certbot/config/live/${GITLAB_WORKSPACES_PROXY_DOMAIN}-0001/privkey.pem"
Note: If you prefer to use your certificates, please copy the files into a safe location, and export the environment variables with the path details.
GitLab OAuth application
After preparing the requirements, continue with the components setup.
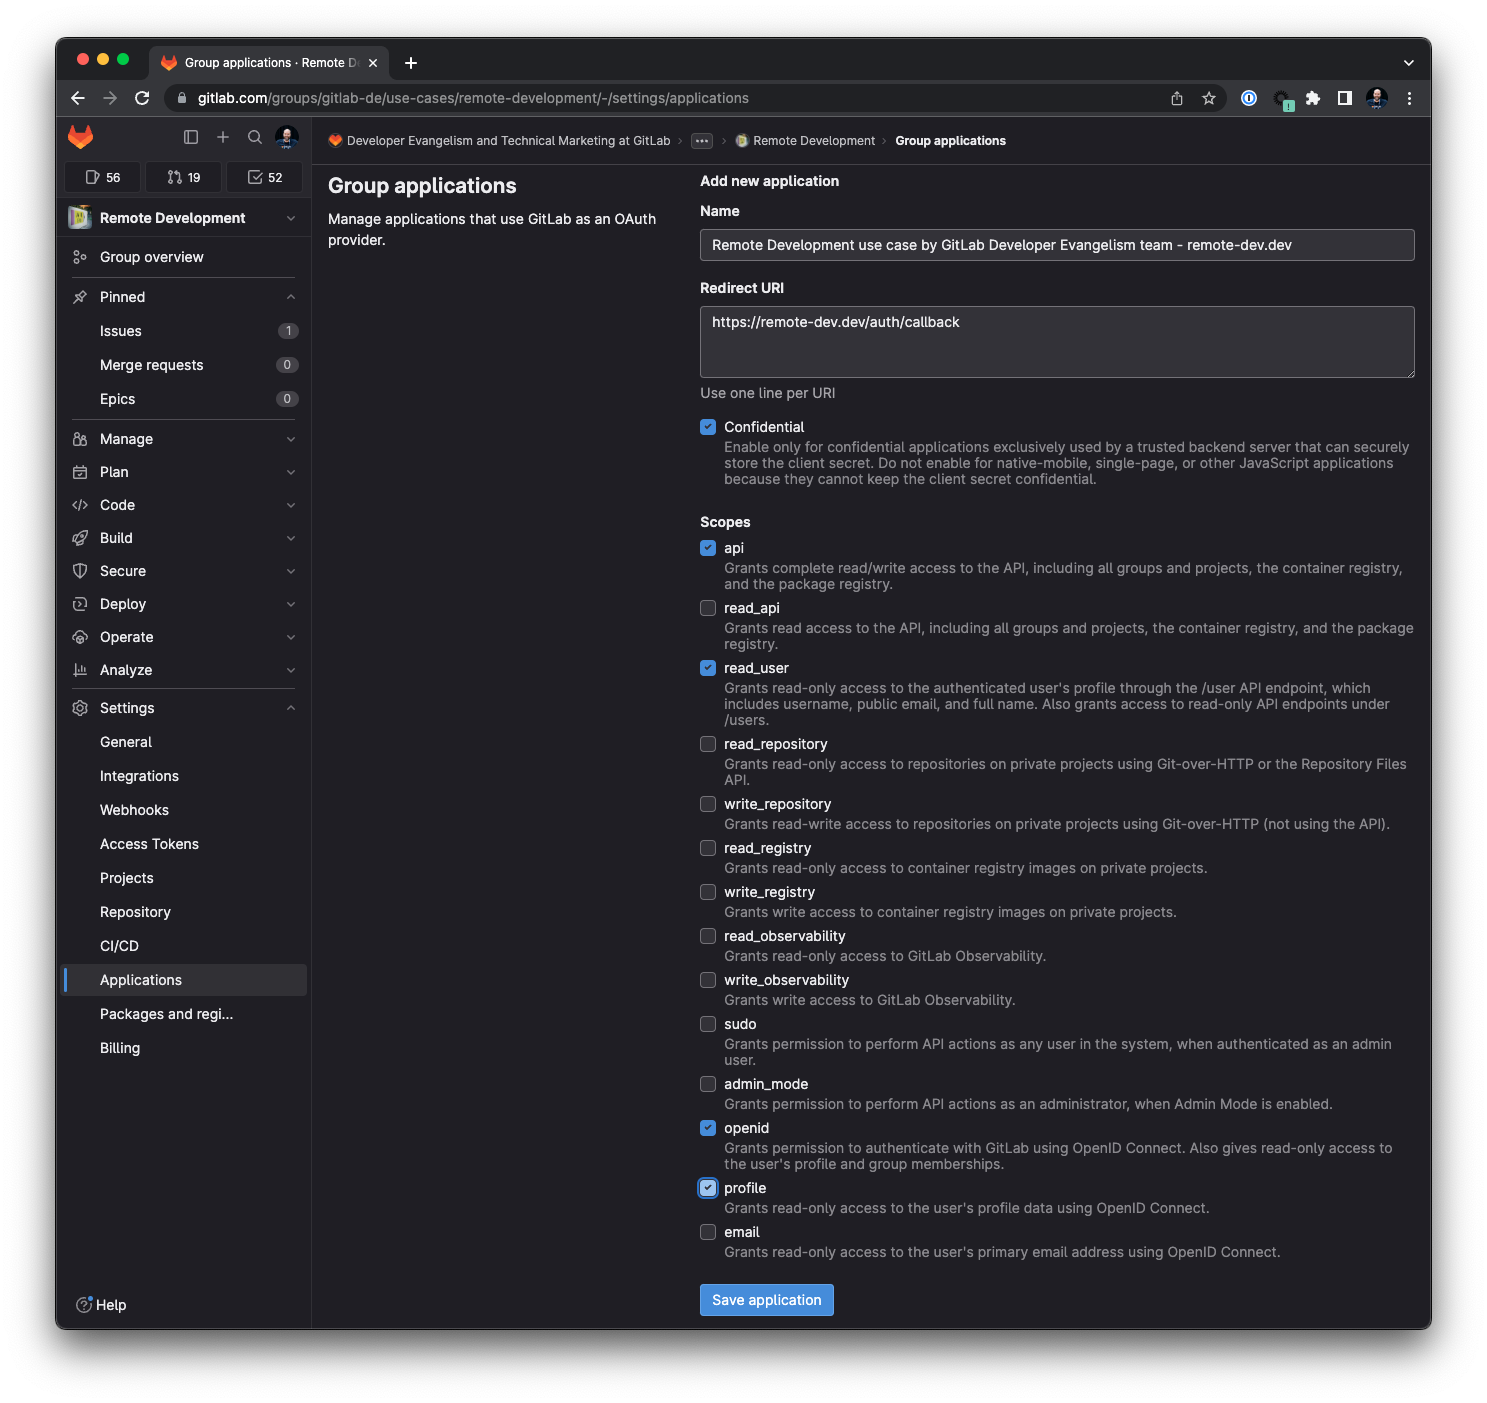
Create a group-owned OAuth application for the remote development workspaces group. Creating a centrally managed app with a service account or group with limited access is recommended for production use.
Navigate into the group Settings > Applications and specify the following values:
- Name:
Remote Development workspaces by <responsible team> - <domain>. Add the reponsible team that is trusted in your organization. For debugging, add the domain. There might be multiple authorization groups, this helps the identification which workspace domain is used. - Redirect URI:
https://<GITLAB_WORKSPACES_PROXY_DOMAIN>/auth/callback. ReplaceGITLAB_WORKSPACES_PROXY_DOMAINwith the domain string value. - Set the scopes to
api, read_user, openid, profile.
Store the OAuth application details in your password vault, and export them as shell environment variables for the next setup steps.
Create a configuration secret for the proxy as a signing key (SIGNING_KEY), and store it in a safe place (for example, use a secrets vault like 1Password to create and store the key).
export CLIENT_ID="XXXXXXXXX" # Look into password vault and set
export CLIENT_SECRET="XXXXXXXXXX" # Look into password vault and set
export REDIRECT_URI="https://${GITLAB_WORKSPACES_PROXY_DOMAIN}/auth/callback"

export GITLAB_URL="https://gitlab.com" # Replace with your self-managed GitLab instance URL if not using GitLab.com SaaS
export SIGNING_KEY="a_random_key_consisting_of_letters_numbers_and_special_chars" # Look into password vault and set
Kubernetes cluster setup
The following sections describe how to set up a Kubernetes cluster in different cloud and on-premises environments and install an ingress controller for HTTP access. After completing the Kubernetes setup, you can continue with the workspaces proxy and agent setup steps.
Choose one method to create a Kubernetes cluster. Note: Use amd64 as platform architecture until multi-architecture support is available for running workspaces. Cloud environments with Arm support will not work yet, for example AWS EKS on Graviton EC2 instances.
You should have defined the following variables from the previous setup steps:
export EMAIL="[email protected]"
export GITLAB_WORKSPACES_PROXY_DOMAIN="remote-dev.dev"
export GITLAB_WORKSPACES_WILDCARD_DOMAIN="*.remote-dev.dev"

export WORKSPACES_DOMAIN_CERT="${HOME}/.certbot/config/live/${GITLAB_WORKSPACES_PROXY_DOMAIN}/fullchain.pem"
export WORKSPACES_DOMAIN_KEY="${HOME}/.certbot/config/live/${GITLAB_WORKSPACES_PROXY_DOMAIN}/privkey.pem"

export WILDCARD_DOMAIN_CERT="${HOME}/.certbot/config/live/${GITLAB_WORKSPACES_PROXY_DOMAIN}-0001/fullchain.pem"
export WILDCARD_DOMAIN_KEY="${HOME}/.certbot/config/live/${GITLAB_WORKSPACES_PROXY_DOMAIN}-0001/privkey.pem"

export CLIENT_ID="XXXXXXXXX" # Look into password vault and set
export CLIENT_SECRET="XXXXXXXXXX" # Look into password vault and set
export REDIRECT_URI="https://${GITLAB_WORKSPACES_PROXY_DOMAIN}/auth/callback"

export GITLAB_URL="https://gitlab.com" # Replace with your self-managed GitLab instance URL if not using GitLab.com SaaS
export SIGNING_KEY="XXXXXXXX" # Look into password vault and set
Set up infrastructure with Google Kubernetes Engine (GKE)
Install and configure the Google Cloud SDK and gcloud CLI, and install the gke-gcloud-auth-plugin plugin to authenticate against Google Cloud.
brew install --cask google-cloud-sdk

gcloud components install gke-gcloud-auth-plugin

gcloud auth login
Create a new GKE cluster using the gcloud command, or follow the steps in the Google Cloud Console.
export GCLOUD_PROJECT=group-community
export GCLOUD_CLUSTER=de-remote-development-1

gcloud config set project $GCLOUD_PROJECT

# Create cluster (modify for your needs)
gcloud container clusters create $GCLOUD_CLUSTER \
    --release-channel stable \
    --zone us-central1-c \
    --project $GCLOUD_PROJECT

# Verify cluster
gcloud container clusters list

NAME                     LOCATION         MASTER_VERSION   MASTER_IP       MACHINE_TYPE  NODE_VERSION       NUM_NODES  STATUS
de-remote-development-1  us-central1-c    1.26.3-gke.1000  34.136.33.199   e2-medium     1.26.3-gke.1000    3          RUNNING

gcloud container clusters get-credentials $GCLOUD_CLUSTER --zone us-central1-c --project $GCLOUD_PROJECT
Fetching cluster endpoint and auth data.
kubeconfig entry generated for de-remote-development-1.
- The setup requires the
Kubernetes Engine Adminrole in Google IAM to create ClusterRoleBindings. - Create a new Kubernetes cluster (do not use Autopilot).
- Ensure that cluster autoscaling is enabled in the GKE cluster.
- Verify that a default Storage Class has been defined.
- Install an Ingress controller, for example ingress-nginx. Follow the documentation and run the following commands to install
ingress-nginxinto the Kubernetes cluster.
kubectl create clusterrolebinding cluster-admin-binding \
  --clusterrole cluster-admin \
  --user $(gcloud config get-value account)

kubectl apply -f https://raw.githubusercontent.com/kubernetes/ingress-nginx/controller-v1.7.1/deploy/static/provider/cloud/deploy.yaml
Print the external IP for the DNS records, and update wildcard DNS (*.remote-dev.dev) and hostname (remote-dev.dev).
gcloud container clusters list

kubectl get services -A
Set up infrastructure with Amazon Elastic Kubernetes Service (EKS)
Creating an Amazon EKS cluster requires cluster IAM roles. You can the eksctl CLI for Amazon EKS, which automatically creates the roles. eksctl requires the AWS IAM Authenticator for Kubernetes, which will get pulled with Homebrew automatically on macOS.
brew install eksctl awscli aws-iam-authenticator
aws configure

eksctl create cluster --name remote-dev \
    --region us-west-2 \
    --node-type m5.xlarge \
    --nodes 3 \
    --nodes-min=1 \
    --nodes-max=4 \
    --version=1.26 \
    --asg-access
The eksctl command uses the --asg-access, --nodes-min/max parameters for auto-scaling. The autoscaler requires additional configuration steps, alternatively Karpenter is supported in Amazon EKS. Review the autoscaling documentation, and default Storage Class gp2 fulfilling the requirements. The Kubernetes configuration is automatically updated locally.
Install the Nginx Ingress controller for EKS. Follow the documentation and run the following command to install ingress-nginx into the Kubernetes cluster.
kubectl apply -f https://raw.githubusercontent.com/kubernetes/ingress-nginx/controller-v1.8.0/deploy/static/provider/aws/deploy.yaml
Print the external IP for the DNS records, and update wildcard DNS (*.remote-dev.dev) and hostname (remote-dev.dev).
eksctl get cluster --region us-west-2 --name remote-dev

kubectl get services -A
Set up infrastructure with Azure Managed Kubernetes Service (AKS)
Install Azure CLI.
brew install azure-cli

az login
Review the documentation for the cluster autoscaler in AKS and the default Storage Class being managed-csi, create a new resource group, and create a new Kubernetes cluster. Download the Kubernetes configuration to continue with the kubectl commands.
az group create --name remote-dev-rg --location eastus

az aks create \
--resource-group remote-dev-rg \
--name remote-dev \
--node-count 1 \
--vm-set-type VirtualMachineScaleSets \
--load-balancer-sku standard \
--enable-cluster-autoscaler \
--min-count 1 \
--max-count 3

az aks get-credentials --resource-group remote-dev-rg --name remote-dev
Install the Nginx ingress controller in AKS. Follow the documentation and run the following commands to install ingress-nginx into the Kubernetes cluster.
NAMESPACE=ingress-basic

helm repo add ingress-nginx https://kubernetes.github.io/ingress-nginx
helm repo update

helm install ingress-nginx ingress-nginx/ingress-nginx \
  --create-namespace \
  --namespace $NAMESPACE \
  --set controller.service.annotations."service\.beta\.kubernetes\.io/azure-load-balancer-health-probe-request-path"=/healthz
Print the external IP for the DNS records, and update wildcard DNS (*.remote-dev.dev) and hostname (remote-dev.dev).
kubectl get services --namespace ingress-basic -o wide -w ingress-nginx-controller

kubectl get services -A
Set up infrastructure with Civo Cloud Kubernetes
Install and configure the Civo CLI, and create a Kubernetes cluster using 2 nodes, 4 CPUs, 8 GB RAM.
civo kubernetes create remote-dev -n 2 -s g4s.kube.large

civo kubernetes config remote-dev --save
kubectl config use-context remote-dev
You have full permissions on the cluster to create ClusterRoleBindings. The default Storage Class is set to 'civo-volume'.
Install the Nginx Ingress controller using Helm. Follow the documentation and run the following command to install ingress-nginx into the Kubernetes cluster.
helm upgrade --install ingress-nginx ingress-nginx \
  --repo https://kubernetes.github.io/ingress-nginx \
  --namespace ingress-nginx --create-namespace
Print the external IP for the DNS records, and update wildcard DNS (*.remote-dev.dev) and hostname (remote-dev.dev).
civo kubernetes show remote-dev

kubectl get services -A
Set up infrastructure with self-managed Kubernetes
The process follows similar steps, requiring a user with permission to create ClusterRoleBinding resources. The Nginx Ingress controller is the fastest path forward. Once the cluster is ready, print the load balancer IP for the DNS records, and create/update A/AAAA record for wildcard DNS (*.remote-dev.dev) and hostname (remote-dev.dev) pointing to the load balancer IP.
Workspaces proxy installation into Kubernetes
After completing the Kubernetes cluster setup with one of your preferred providers, please continue with the next steps.
Add the Helm repository for the workspaces proxy (it is using the Helm charts feature in the GitLab package registry).
helm repo add gitlab-workspaces-proxy \
  https://gitlab.com/api/v4/projects/gitlab-org%2fremote-development%2fgitlab-workspaces-proxy/packages/helm/devel
Install the gitlab-workspaces-proxy, and optionally specify the most current chart version. If you are using a different ingress controller than Nginx, you need to change the ingress.className key. Re-run the command when new TLS certificates need to be installed.
helm repo update

helm upgrade --install gitlab-workspaces-proxy \
  gitlab-workspaces-proxy/gitlab-workspaces-proxy \
  --version 0.1.6 \
  --namespace=gitlab-workspaces \
  --create-namespace \
  --set="auth.client_id=${CLIENT_ID}" \
  --set="auth.client_secret=${CLIENT_SECRET}" \
  --set="auth.host=${GITLAB_URL}" \
  --set="auth.redirect_uri=${REDIRECT_URI}" \
  --set="auth.signing_key=${SIGNING_KEY}" \
  --set="ingress.host.workspaceDomain=${GITLAB_WORKSPACES_PROXY_DOMAIN}" \
  --set="ingress.host.wildcardDomain=${GITLAB_WORKSPACES_WILDCARD_DOMAIN}" \
  --set="ingress.tls.workspaceDomainCert=$(cat ${WORKSPACES_DOMAIN_CERT})" \
  --set="ingress.tls.workspaceDomainKey=$(cat ${WORKSPACES_DOMAIN_KEY})" \
  --set="ingress.tls.wildcardDomainCert=$(cat ${WILDCARD_DOMAIN_CERT})" \
  --set="ingress.tls.wildcardDomainKey=$(cat ${WILDCARD_DOMAIN_KEY})" \
  --set="ingress.className=nginx"
The chart installs and configures the ingress automatically. You can verify the setup by getting the Ingress resource type:
kubectl get ingress -n gitlab-workspaces

NAME                      CLASS   HOSTS                             ADDRESS   PORTS     AGE
gitlab-workspaces-proxy   nginx   remote-dev.dev,*.remote-dev.dev             80, 443   9s
Agent for Kubernetes installation
Create the agent configuration file in .gitlab/agents/<agentname>/config.yaml, add to git, and push it into the repository. The remote_development key specifies the dns_zone, which must be set to the workspaces domain. Additionally, the integration needs to be enabled. The observability key intentionally configures debug logging for the first setup to troubleshoot faster. You can adjust the logging levels for production usage.
export GL_AGENT_K8S=remote-dev-dev

$ mkdir agent-kubernetes && cd agent-kubernetes
$ mkdir -p .gitlab/agents/${GL_AGENT_K8S}/

$ cat <<EOF >.gitlab/agents/${GL_AGENT_K8S}/config.yaml
remote_development:
    enabled: true
    dns_zone: "${GITLAB_WORKSPACES_PROXY_DOMAIN}"

observability:
  logging:
    level: debug
    grpc_level: warn
EOF

$ git add .gitlab/agents/${GL_AGENT_K8S}/config.yaml
$ git commit -avm "Add agent for Kubernetes configuration"
# adjust the URL to your GitLab server URL and project path
$ git remote add origin https://gitlab.example.com/remote-dev-workspaces/agent-kubernetes.git
# will create a private project when https/PAT is used
$ git push
Open the GitLab project in your browser, navigate into Operate > Kubernetes Clusters, and click the Connect a new cluster (agent) button. Select the agent from the configuration dropdown, and click Register. The form generates a ready-to-use Helm chart CLI command. Similar to the command below, replace XXXXXXXXXXREPLACEME with the actual token value.
helm repo add gitlab https://charts.gitlab.io
helm repo update
helm upgrade --install remote-dev-dev gitlab/gitlab-agent \
    --namespace gitlab-agent-remote-dev-dev \
    --create-namespace \
    --set image.tag=v16.0.1 \
    --set config.token=XXXXXXXXXXREPLACEME \
    --set config.kasAddress=wss://kas.gitlab.com # Replace with your self-managed GitLab KAS instance URL if not using GitLab.com SaaS
Run the commands, and verify that the agent is connected in the Operate > Kubernetes Clusters overview. You can access the pod logs using the following command:
$ kubectl get ns
NAME                          STATUS   AGE
gitlab-agent-remote-dev-dev   Active   9d
gitlab-workspaces             Active   22d
...

$ kubectl logs -f -l app.kubernetes.io/name=gitlab-agent -n gitlab-agent-$GL_AGENT_K8S
Congrats! Your infrastructure setup for on-demand, cloud-based development environments is complete.
Workspaces creation
After completing the infrastructure setup, you must verify that all components work together and users can create workspaces. You can fork or import the example-python-http-simple project into your GitLab group with access to the GitLab agent for Kubernetes to try it immediately. The project provides a simple Python web app with Flask that provides different HTTP routes. Alternatively, start with a new project and create a .devfile.yaml with the example configuration.
Optional: Inspect the .devfile.yaml file to learn about the configuration format. We will look into the image key later.
schemaVersion: 2.2.0
components:
  - name: py
    attributes:
      gl/inject-editor: true
    container:
      # Use a custom image that supports arbitrary user IDs.
      # NOTE: THIS IMAGE IS NOT ACTIVELY MAINTAINED. DEMO USE CASES ONLY, DO NOT USE IN PRODUCTION.
      # Source: https://gitlab.com/gitlab-de/use-cases/remote-development/container-images/python-remote-dev-workspaces-user-id
      image: registry.gitlab.com/gitlab-de/use-cases/remote-development/container-images/python-remote-dev-workspaces-user-id:latest
      memoryRequest: 1024M
      memoryLimit: 2048M
      cpuRequest: 500m
      cpuLimit: 1000m
      endpoints:
        - name: http-python
          targetPort: 8080
Create the first workspaces
Navigate to the Your Work > Workspaces menu and create a new workspace. Search for the project name, select the agent for Kubernetes, and create the workspace.

Open two terminals to follow the workspaces proxy and agent logs in the Kubernetes cluster.
$ kubectl logs -f -l app.kubernetes.io/name=gitlab-workspaces-proxy -n gitlab-workspaces

{"level":"info","ts":1686331102.886607,"caller":"server/server.go:74","msg":"Starting proxy server..."}
{"level":"info","ts":1686331133.146862,"caller":"upstream/tracker.go:47","msg":"New upstream added","host":"8080-workspace-62029-5534214-2vxdxq.remote-dev.dev","backend":"workspace-62029-5534214-2vxdxq.gl-rd-ns-62029-5534214-2vxdxq","backend_port":8080}
2023/06/09 17:21:10 getHostnameFromState state=https://60001-workspace-62029-5534214-2vxdxq.remote-dev.dev/folder=/projects/demo-python-http-simple
$ kubectl logs -f -l app.kubernetes.io/name=gitlab-agent -n gitlab-agent-$GL_AGENT_K8S

{"level":"debug","time":"2023-06-09T18:36:19.839Z","msg":"Applied event","mod_name":"remote_development","apply_event":"WaitEvent{ GroupName: \"wait-0\", Status: \"Pending\", Identifier: \"gl-rd-ns-62029-5534214-k66cjy_workspace-62029-5534214-k66cjy-gl-workspace-data__PersistentVolumeClaim\" }","agent_id":62029}
{"level":"debug","time":"2023-06-09T18:36:19.866Z","msg":"Received update event","mod_name":"remote_development","workspace_namespace":"gl-rd-ns-62029-5534214-k66cjy","workspace_name":"workspace-62029-5534214-k66cjy","agent_id":62029}
{"level":"debug","time":"2023-06-09T18:36:43.627Z","msg":"Applied event","mod_name":"remote_development","apply_event":"WaitEvent{ GroupName: \"wait-0\", Status: \"Successful\", Identifier: \"gl-rd-ns-62029-5534214-k66cjy_workspace-62029-5534214-k66cjy_apps_Deployment\" }","agent_id":62029}
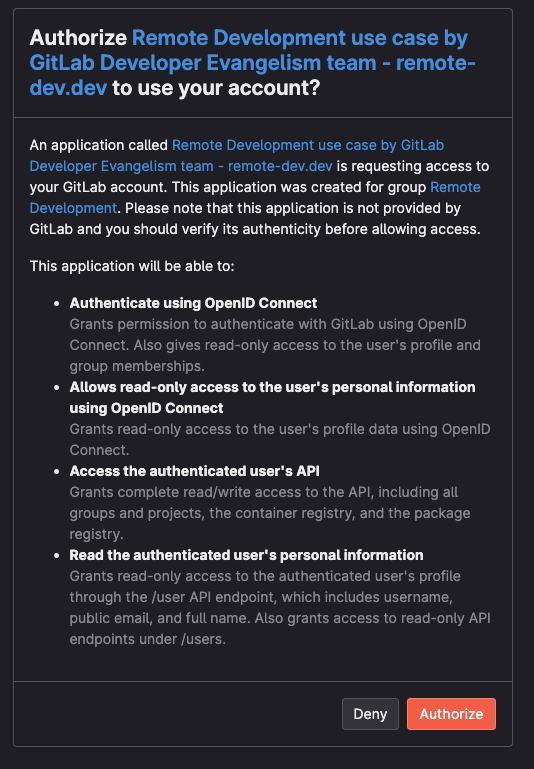
Wait until the workspace is provisioned successfully, and click to open the HTTP URL, example format https://60001-workspace-62029-5534214-2vxdxq.remote-dev.dev/?folder=%2Fprojects%2Fexample-python-http-simple. The GitLab OAuth application will ask you for authorization.
You can select the Web IDE menu, open a new terminal (cmd shift p and search for terminal create). More shortcuts and Web IDE usage are documented here.
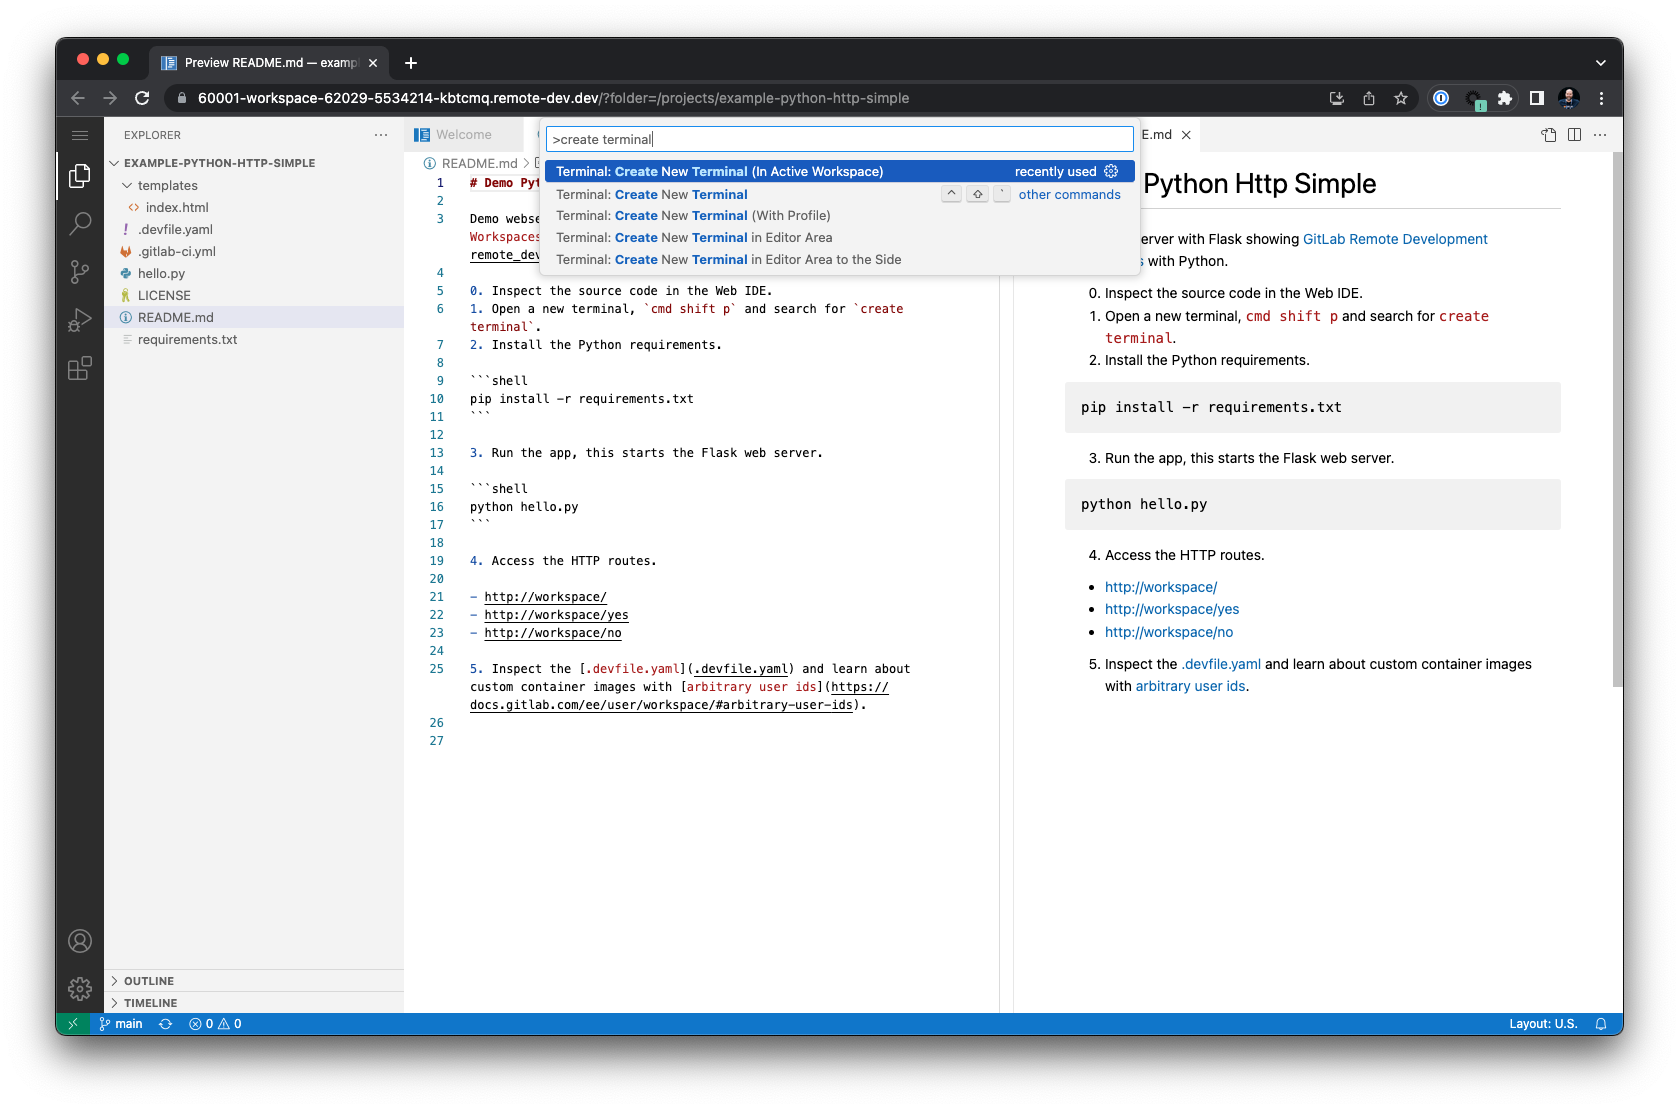
Using the Python example project, try to run the hello.py file with the Python interpreter after changing the terminal to bash to access auto-completion and shell history. Type pyth, press tab, type hel, press tab, enter.
$ bash

$ python hello.py
The command will fail because the Python requirements still need to be installed. Let us fix that by running the following command:
$ pip install -r requirements.txt
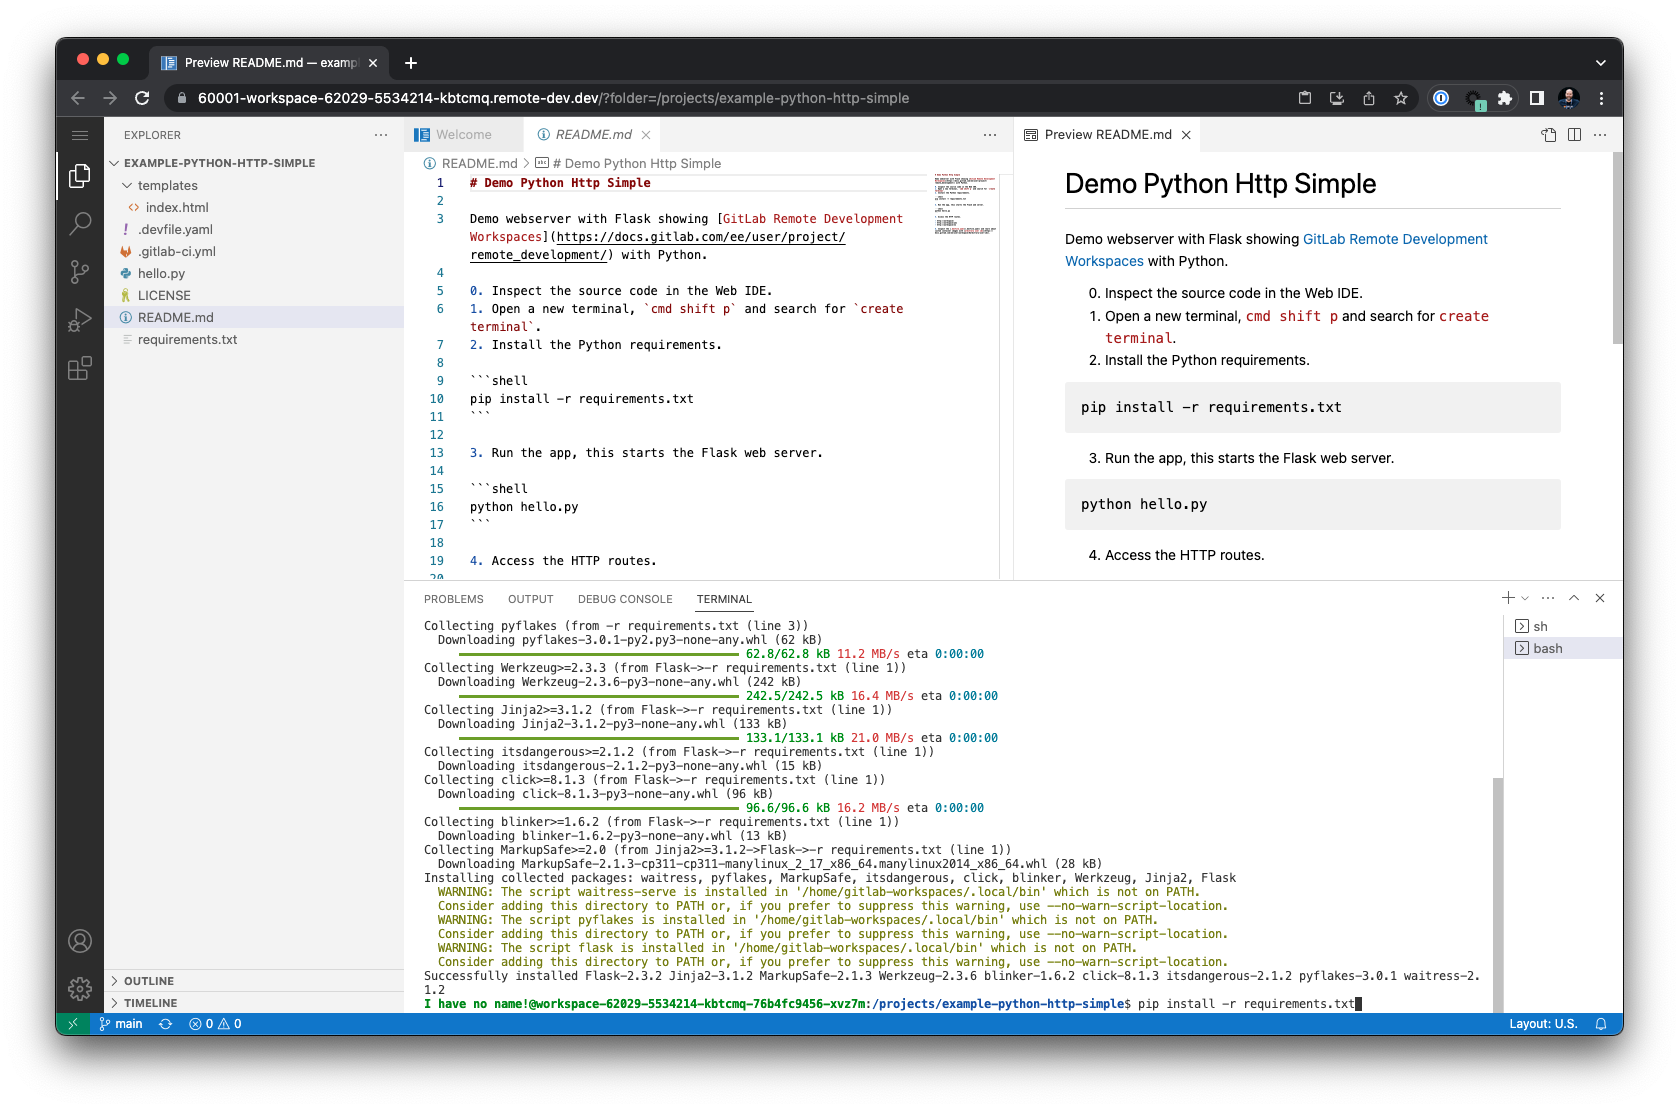
Note: This example is intentionally kept simple, and does not use best practices with pyenv for managing Python environments. We will explore development environment templates in future blog posts.
Run the Python application hello.py again to start the web server on port 8080.
$ python hello.py
You can access the exposed port by modifying the URL from the default port at the beginning of the URL to the exposed port 8080. The ?folder URL parameter can also be removed.
-https://60001-workspace-62029-5534214-kbtcmq.remote-dev.dev/?folder=/projects/example-python-http-simple
+https://8080-workspace-62029-5534214-kbtcmq.remote-dev.dev/
The URL is not publicly available and requires access through the GitLab OAuth session.

Modifying the workspace requires custom container images supporting to run with arbitrary user IDs. The example project uses a custom image which allows to install Python dependencies and create build artifacts. It also allows to use the bash terminal shown above. Learn more about custom image creation in the next section.
Custom workspace container images
Custom container images require support for arbitrary user IDs. You can build custom container images with GitLab CI/CD and use the GitLab container registry to distribute the container images on the DevSecOps platform.
Workspaces run with arbitrary user IDs in the Kubernetes cluster containers and manage resource access with Linux group permissions. Existing container images may need to be changed, and imported as base image for new container images. The following example uses the python:3.11-slim-bullseye image from Docker Hub as a base container image in the FROM key. The next steps create and set a home directory in /home/gitlab-workspaces, and manage user and group access to specified directories. Additionally, you can install more convenience tools and configurations into the image, for example the git package.
# Example demo for a Python-based container image.
# NOTE: THIS IMAGE IS NOT ACTIVELY MAINTAINED. DEMO USE CASES ONLY, DO NOT USE IN PRODUCTION.

FROM python:3.11-slim-bullseye

# User id for build time. Runtime will be an arbitrary random ID.
RUN useradd -l -u 33333 -G sudo -md /home/gitlab-workspaces -s /bin/bash -p gitlab-workspaces gitlab-workspaces

ENV HOME=/home/gitlab-workspaces

WORKDIR $HOME

RUN mkdir -p /home/gitlab-workspaces && chgrp -R 0 /home && chmod -R g=u /etc/passwd /etc/group /home

# TODO: Add more convenience tools into the user home directory, i.e. enable color prompt for the terminal, install pyenv to manage Python environments, etc
RUN apt update && \
    apt -y --no-install-recommends install git procps findutils htop vim curl wget && \
    rm -rf /var/lib/apt/lists/*

USER gitlab-workspaces
As an exercise, fork the project and modify the package installation step in the Dockerfile file to install the dnsutils package on the Debian based image to get access to the dig command.
-RUN apt update && \
-    apt -y --no-install-recommends install git procps findutils htop vim curl wget && \
-    rm -rf /var/lib/apt/lists/*
+RUN apt update && \
+    apt -y --no-install-recommends install git procps findutils htop vim curl wget dnsutils && \
+    rm -rf /var/lib/apt/lists/*
Build the container image with your preferred CI/CD workflow. On GitLab.com SaaS, you can include the Docker.gitlab-ci.yml template which takes care of building the image.
include:
    - template: Docker.gitlab-ci.yml
When building the container images manually, use Linux and amd64 as platform architecture until multi-architecture support is available for running workspaces. Also, review the optimizing images guide in the documentation when creating custom container images to optimize size and build times.
Navigate into Deploy > Container Registry in the GitLab UI and copy the image URL from the tagged image. Open the .devfile.yaml file in the forked GitLab project example-python-http-simple, and change the image path to the newly built image URL.
-      image: registry.gitlab.com/gitlab-de/use-cases/remote-development/container-images/python-remote-dev-workspaces-user-id:latest
+      image: registry.gitlab.example.com/remote-dev-workspaces/python-remote-dev-workspaces-user-id:latest
Navigate into Your Work > Workspaces and create a new workspace for the project, and try to execute the dig command to query the IPv6 address of GitLab.com (or any other internal domain).
$ dig +short gitlab.com AAAA
The custom container image project is located here.
Tips
This blog post's setup steps with environment variables are easy to follow. For production usage, use automation to manage your environment with Terraform, Ansible, etc.
- Terraform: Provision a GKE Cluster (Google Cloud), Provision an EKS Cluster (AWS), Provision an AKS Cluster (Azure), Deploy Applications with the Helm Provider
- Ansible: google.cloud.gcp_container_cluster module, community.aws.eks_cluster module, azure.azcollection.azure_rm_aks module, kubernetes.core collection
Certificate management
The workspaces domain requires a valid TLS certificate. The examples above used certbot with Let's Encrypt, requiring a certificate renewal after three months. Depending on your corporate requirements, you may need to create TLS certificates signed by the corporate CA identity and manage the certificates. Alternatively, you can look into solutions like cert-manager for Kubernetes that will help renew certificates automatically.
Do not forget to add TLS certificate validity monitoring to avoid unforeseen errors. The blackbox exporter for Prometheus can help with monitoring TLS certificate expiry and send alerts.
Troubleshooting
Here are a few tips for troubleshooting connections and inspecting the cluster resources.
Verify the connections
Try to connect to the workspaces domain to see whether the Kubernetes Ingress controller responds to HTTP requests.
$ curl -vL ${GITLAB_WORKSPACES_PROXY_DOMAIN}
Inspect the logs of the proxy deployment to follow connection requests. Since the proxy requires an authorization token sent via the OAuth app, an HTTP 400 error is expected for unauthenticated curl requests.
$ kubectl logs -f -l app.kubernetes.io/name=gitlab-workspaces-proxy -n gitlab-workspaces
Check if the TLS certificate is valid. You can also use sslcan and other tools.
$ openssl s_client -connect ${GITLAB_WORKSPACES_PROXY_DOMAIN}:443

$ sslcan ${GITLAB_WORKSPACES_PROXY_DOMAIN}
Debug the agent for Kubernetes and inspect the pod logs.
$ kubectl get ns

$ kubectl logs -f -l app.kubernetes.io/name=gitlab-agent -n gitlab-agent-<NAMESPACENAME>
Workspaces cannot be created even if the agent is connected
When the workspaces deployment is spinning and nothing happens, try restarting the workspaces proxy and agent for Kubernetes. This is a known problem and tracked in this issue.
$ kubectl rollout restart deployment -n gitlab-workspaces

$ kubectl rollout restart deployment -n gitlab-agent-$GL_AGENT_K8S
If the agent for Kubernetes remains unresponsive, consider a complete reinstall. First, navigate into the GitLab UI into Operate > Kubernetes Clusters and delete the agent. Next, use the following commands to delete the Helm release from the cluster, and run the installation command generated from the UI again.
kubectl get ns
helm list -A

export RELEASENAME=xxx
export NAMESPACENAME=xxx
export TOKEN=XXXXXXXXXXREPLACEME
helm uninstall ${RELEASENAME} -n gitlab-agent-${NAMESPACENAME}

helm repo add gitlab https://charts.gitlab.io
helm repo update

helm upgrade --install ${RELEASENAME} gitlab/gitlab-agent \
    --namespace gitlab-agent-${NAMESPACENAME} \
    --create-namespace \
    --set image.tag=v16.1.2 \
    --set config.token=${TOKEN} \
    --set config.kasAddress=wss://kas.gitlab.com # Replace with your self-managed GitLab KAS instance URL if not using GitLab.com SaaS
Example: helm uninstall remote-dev-dev -n gitlab-agent-remote-dev-dev
Cannot modify workspace using custom images
If you cannot modify the workspace, open a new terminal and check the user id and their groups.
$ id
Inspect the .devfile.yaml file in the project and extract the image attribute to test the used container image. You can use container CLI, for example docker that runs the container with a different user ID. Note: You can use any user ID to test the behavior.
Tip: Use grep and cut commands to extract the image attribute URL from the .devfile.yaml.
$ cat .devfile.yaml | grep image: | cut -f2 -d ':')
Run the following command to execute the id command in the container, and print the user information.
$ docker run -u 1234 -ti registry.gitlab.com/path/to/project/image:tagname id
Try to modify the workspace by running the command echo 'Hi' >> ~/example.md. This can fail with a permission error.
$ docker run -u 1234 -ti registry.gitlab.com/path/to/project/image:tagname echo 'Hi' >> ~/example.md
If the above command failed, the Linux user group does not have enough permissions to modify the file. You can view the permissions using the ls command.
$ docker run -u 1234 -ti registry.gitlab.com/path/to/project/image:tagname ls -lart ~/
Contribute
The remote development developer documentation provides insights into the architecture blueprint and how to set up a local development environment to start contributing. In the future, we will be able to use remote development workspaces to develop remote development workspaces.
Share your feedback
In this blog post, you have learned how to manage the infrastructure for remote development workspaces, create your first workspace, and more tips on custom workspace images and troubleshooting. Using the same development environment across organizations and communities, developers can focus on writing code and get fast preview feedback (i.e., by running a web server that can be accessed externally in the remote workspace). Providing the same reproducible environment also helps opensource contributors to reproduce bugs and provide feedback most efficiently. They can use the same best practices as upstream maintainers.
Developers and DevOps engineers will be using the Web IDE in workspaces. Later, being able to connect their desktop client to workspaces, they can take advantage of even more efficiency with the most comprehensive AI-powered DevSecOps platform: Code suggestions and more AI-powered workflows are just one fingertip away.
What will your teams build with remote development workspaces? Please share your experiences in the feedback issue, blog about your setup, and join our community forum for more discussions.
Cover image by Nick Karvounis on Unsplash


